At some point in time you are going to run into a situation where you are going to have to lay out a large graphic by hand onto a flat substrate. When using the proper tools and air egress vinyl, it is going to make your life so much easier.
The flat substrate used in this demonstration is a big aluminum panel – one of the most aggressive surfaces on which to lay a graphic. Before beginning the application, make sure your graphic is the proper size for your substrate, including a little extra on all edges for trimming.
What you’lL learn:
Discover how to manually apply a graphic with air egress vinyl.
Ensure cleanliness and size compatibility in your graphic.
Use a back-slitting tool to control adhesive exposure in a application.
Secure, fold, and expose adhesive strategically for precise placement.
Opt for a felt-edged squeegee to eliminate wrinkles and air pockets.
Achieve a polished finish by trimming edges, with air egress vinyl.
Play Video
Share this video:
Flat Substrate Application
Prepare the Flat Substrate and Graphic
To begin, wipe down the flat substrate with a clean rag and a little isopropyl alcohol. It is important to make sure that your substrate, graphic and work area remain clean. Place a few small pieces of double sided tape on the back side of the panel to keep it from moving while laying out the graphic.
A Smooth Application
The key to a smooth application is exposing the minimum amount of adhesive necessary, so that you are in control of the application at all times.
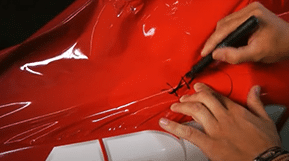
Use a back-slitting tool, such as the bodyguard knife, to make two slits along the centre of the liner, about one inch apart. This tool slits only the liner, leaving the graphic intact.
Use this back-slitting knife to slit the liner.
Secure the graphic on one end. Then loosely fold it in the center, and expose the one inch wide strip of adhesive.
For best results with air egress vinyl, we recommend using a squeegee with a felt edge. Holding the vinyl up from the flat substrate, carefully apply the one inch center strip.
Fold back one half of the graphic, and release a portion of the liner. Make a sharp crease in the liner to create a handle. That allows you to control the exposure of adhesive.
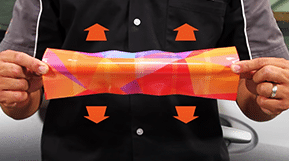
Work your squeegee from the middle of the graphic to the end you are holding. Continue to release more liner as your application progresses. Then, apply the other part of the graphic using the same technique. Air egress vinyl makes it easy to work out any remaining wrinkles and air pockets.
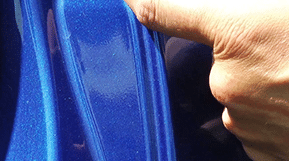
Once this is done, trim the edges and the flat substrate application is complete. With air egress vinyl and the back-slitter, your days of struggling with vinyl are over!
Removing old graphics can be a time consuming part of any wrap project. This video shows expert techniques...
Add your comment
Your email address will not be published. Required fields are marked.*
This site uses Akismet to reduce spam.
Learn how your comment data is processed.
Lorem ipsum dolor sit amet, consectetur adipiscing elit, sed do eiusmod tempor incididunt ut labore et dolore magna aliqua. Quis ipsum suspendisse ultrices gravida. Risus commodo viverra Maecenas.
guest_l8uf0ka95
Lorem ipsum dolor sit
Lorem ipsum dolor sit amet, consectetur adipiscing elit, sed do eiusmod tempor incididunt ut labore et dolore magna aliqua. Quis ipsum suspendisse ultrices gravida. Risus commodo viverra Maecenas.
guest_0jf3ajmap
Lorem ipsum dolor sit
Lorem ipsum dolor sit amet, consectetur adipiscing elit, sed do eiusmod tempor incididunt ut labore et dolore magna aliqua. Quis ipsum suspendisse ultrices gravida. Risus commodo viverra Maecenas.
guest_z97p2har7
Lorem ipsum dolor sit
BECOME A WRAP IT RIGHT INSIDER
Get expert vinyl installation videos straight to your inbox. Plus, unlock exclusive perks just for you.