Applying exterior wall graphics presents significantly greater challenges than interior walls. Exterior walls present more options in their construction: materials such as concrete, brick, or cinder block; textures which range from smooth to extremely textured; and finishes from primed to painted to bare.

Preparing for Exterior Wall Graphics

Before wrapping any exterior wall, it must be properly tested for media compatibility. Not only will this help you select the right media, but it will also determine if the wall can actually be wrapped.

Relatively smooth exterior walls may share the same installation procedure as interior walls; but how about textured walls? To achieve a paint-like finish, the graphic has to be installed in a way that it follows the wall’s texture.

1. Begin by thoroughly cleaning the surface and removing excess grout and large imperfections.

2. Prepare your tools: Snap-off blades, a heat gun, a foam roller, wrap glove, IR thermometer, and a high tack masking tape. Although a torch is more convenient than a heat gun, it is harder to control and will most likely burn the film given the installation rate for textured walls.

3. It is vitally important to make sure that all of the graphic panels for the job are properly prepared off-site. For details on this preparation, see the WrapItRight® article on Tiling for Large Wall Graphics. For wall graphics with partial coverage, you can use any of the horizontal joints as a reference for level, because during construction these joints of are often checked for level. However, it is important that none of the panels’ edges actually go on top of joints and grout lines.

Installing Exterior Wall Graphics

Apply small strips of masking tape to serve as guides to offset the graphic’s top edge a couple of inches from the grout line. For partial wraps, set the graphic’s location by applying tape along the top edge. For full wraps, set the location on two sides.

Line up the first tile with your guides, anchor the top with the high tack masking tape, and let the graphic hang loose. Remove the 2-inch liner strip and apply lightly with hand pressure.

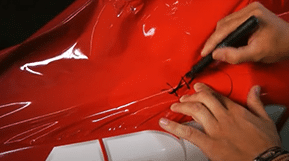
Next, remove the release liner above this anchor point and apply this small section using the same light pressure. Continue setting the graphic from top to bottom using light hand pressure, peeling the liner in 2-foot increments. Roll up the waste liner and set it aside or throw it in the trash. With the whole panel set, use a foam roller and a heat gun at a rate of approximately 4 inches per second to seal the top, left, and bottom edge to prevent the film from shrinking. Proceed with the same application rate starting from the top, applying from left to right, starting and ending beyond the graphic, and overlapping each stroke by 50%.

Once the first tile is installed, anchor the next tile on the top two corners with masking tape. With the panel hanging loose, use the registration marks made of blue masking tape to properly align the two tiles. Have somebody help you check the alignment of the remaining blue tape and adjust when necessary.

Once the alignment is set, apply using the same method as the first tile. As you work your way from top to bottom, keep checking your overlap and alignment. Repeat this process for all panels until you reach your desired coverage.

Sealing the top edge of the graphic is highly recommended. Apply masking tape to protect the graphic and exposed wall. Then use a brush-on sealer available from your local distributor, or silicone sealants from any home improvement store.

Digitally printed exterior wall graphics can achieve amazing results that paint simply cannot. So to maintain and improve the appearance of printed wall graphics, wrap it right the first time, on time, every time.

Share your feedback about this video! Share your feedback about this video!

Louie Calma

Louie started working with Arlon Graphics’ Technical Services in 2013.  By being part of a team whose goal is to bridge end-user’s demands to R&D and QA, he was able to gain both external and internal insights on how graphic films are designed, made, used and improved. His automotive background also allowed him to contribute ideas regarding technologies in the automotive industry that may affect a product’s design.

View all posts

1 comment

Your email address will not be published. Required fields are marked *

This site uses Akismet to reduce spam. Learn how your comment data is processed.

Louie Calma

Louie started working with Arlon Graphics’ Technical Services in 2013.  By being part of a team whose goal is to bridge end-user’s demands to R&D and QA, he was able to gain both external and internal insights on how graphic films are designed, made, used and improved. His automotive background also allowed him to contribute ideas regarding technologies in the automotive industry that may affect a product’s design.

Stay Connected: Subscribe to the Wrapitright Newsletter
What do you want to learn? Share your video ideas with us. What do you want to learn? Share your video ideas with us.
Hablas Español? Ver en Youtube Sprechen Sie Deutsch? Auf youtube ansehen Parlez-vous Français? Regarder sur Youtube
Connect with us on Facebook