Today, printed interior wall graphics are gradually taking over paint and wallpaper due to their ease of application and removal, customizability and even profitability.
Most zero or low VOC paints have many additives that prevent adhesive from sticking to it. That is why it’s necessary to conduct tests to ensure that the surface can be wrapped. Before starting a wall project, make sure that you watch our WrapItRight video on ‘Testing a Wall for Media Compatibility’.
What you’lL learn:
Interior wall graphics replace paint and wallpaper for customization.
Verify adhesive compatibility with low VOC paint before wall projects.
Use tools like Felt Squeegee, Snap-Off Blades, and masking tape.
Ensure offsite panel preparation per guidelines for wall graphics.
Align, apply, and squeegee tiles while maintaining alignment.
Handle obstructions, excess material, and post-heat edges.
Play Video
Share this video:
Installing Large Interior Wall Graphics
Tools for Installing Interior Wall Graphics
Have your application tools ready: a Felt Squeegee or a Wrap Mafia Bill Collector, Snap-Off Blades and high tack masking tape. In the same way, make sure your work site equipment is also set; a scaffold, ladder or scissor lift, laser level, screwdriver and brushes to dust off crevices.
It is vitally important to make sure that all graphic panels for the job are prepared offsite. For details on this preparation see the WrapItRight video on ‘Tiling Large Wall Graphics’.
In this example, we are installing on a free-standing wall with no ceilings or adjacent walls. This wall is already clean. It is clear of spider webs, removable obstructions and is ready for application. Carefully measure and mark the position of the inside edge of the first tile. Using a laser level to ensure plumb, apply masking tape markers on the outside of this line every few feet.
First, align the inner edge of the first time with these markers. Then, anchor the top with the high-tack masking tape and let the graphic hang loose. Line up the first tile with your guides. Remove the 2 inch strip of release liner and squeegee from the center out.
Next, remove the release liner above this anchor point and apply. Work from top to bottom, peeling the liner in 2 feet increments. Squeegee from the center out.
For the next tile, apply masking tape on the top two corners. With it hanging loose, line up the registration marks made of blue masking tape. For this project, we used a quarter inch overlap and trimmed excess material. Have somebody help you check the alignment of the remaining blue tape. Adjust when necessary.
Once the alignment is set, remove the 2 inch strip of liner. Then, apply to set your permanent anchor. Install the same way as the first tile. Apply the section above the anchor, work towards the bottom, and squeegee from center out, 2 feet at a time. As you work your way from top to bottom keep checking your overlap in alignment.
Finishing Touches
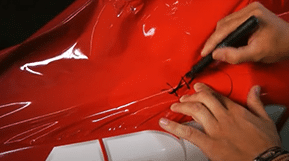
When you reach an obstruction such an electrical outlet, continue your standard application. When you reach the top edge, loosely tack the vinyl over the obstructions and make a relief cut. Then apply the vinyl around the outlet. Once the film has been set all around, trim.
After completing the wall wrap, reinstall outlet plates. Repeat until you achieve full covered and trim the excess material from the bottom and sides. To ensure long-term durability, post heat and apply firm pressure on the edges and overlaps.
Above all, use the right tools, media, preparation, and application technique. Certainly, this will ensure an efficient, safe, and profitable install.
Removing old graphics can be a time consuming part of any wrap project. This video shows expert techniques...
Add your comment
Your email address will not be published. Required fields are marked.*
This site uses Akismet to reduce spam.
Learn how your comment data is processed.
Lorem ipsum dolor sit amet, consectetur adipiscing elit, sed do eiusmod tempor incididunt ut labore et dolore magna aliqua. Quis ipsum suspendisse ultrices gravida. Risus commodo viverra Maecenas.
guest_l8uf0ka95
Lorem ipsum dolor sit
Lorem ipsum dolor sit amet, consectetur adipiscing elit, sed do eiusmod tempor incididunt ut labore et dolore magna aliqua. Quis ipsum suspendisse ultrices gravida. Risus commodo viverra Maecenas.
guest_0jf3ajmap
Lorem ipsum dolor sit
Lorem ipsum dolor sit amet, consectetur adipiscing elit, sed do eiusmod tempor incididunt ut labore et dolore magna aliqua. Quis ipsum suspendisse ultrices gravida. Risus commodo viverra Maecenas.
guest_z97p2har7
Lorem ipsum dolor sit
BECOME A WRAP IT RIGHT INSIDER
Get expert vinyl installation videos straight to your inbox. Plus, unlock exclusive perks just for you.