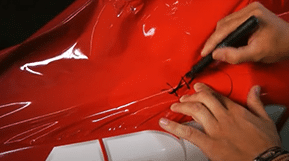
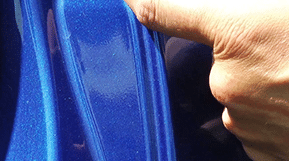
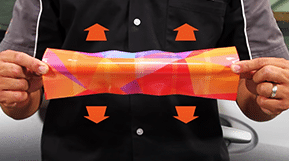
There’s no better way to get a graphic application started than by making the perfect hinge using a double back-slitting knife. Use the hinge method to make installation easier for you. This is the double back-slitting knife. The body of the knife is teflon-coated.

Making the Cut – The Hinge Method
First, roll back enough liner paper to insert both guards of the knife. Then insert the knife and make an edge-to-edge cut where you want a hinge.
If you use material with an air-egress liner, the liner over the hinge will fall off easily after making the cut. Simply add a piece of tape wider than your cut to both sides of the hinge. Now you can safely transport the graphic to the application site.
Installation
Position the graphic with tape and then remove the liner hinge. Add a small amount of tension below the hinge to prevent it from pre-tacking. Now, install the hinge.
Next, remove the top piece of liner and begin the installation. Then roll back approximately 10 inches of the remaining liner. Complete the application.
Once across, two slices, and you’ve got the perfect hinge.
The hinge method is perfect for installing on flat substrates, vehicles, and more.
Where can I purchase a double back-slitting knife?
Hi Dave- You can purchase the Double Back Slitting knife from Yellotools. http://yellotools.us/Cutting/Knives-Cutters-Scissors/bodyguard-knife-twin.html
Great technique! That’ll be useful when we only have a single installer.
Yeah, where do we purchase the Double Back Slitting knife with Teflon coating?
Hi Juney- You can purchase the Double Back Slitting knife from Yellotools. http://yellotools.us/Cutting/Knives-Cutters-Scissors/bodyguard-knife-twin.html
I really like your explanation of the hinge method of air release vinyl, Thank you
The hinge method for air release vinyl is the best way to go! Dry install all the way, we don’t do as many wet installs anymore … thanks for the info!